一、小知识
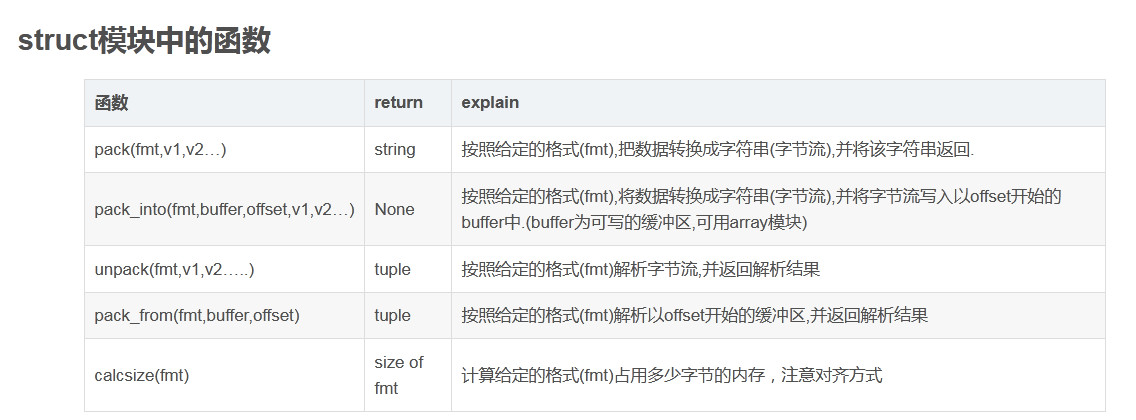
1.struct
用处
1.按照指定格式将Python数据转换为字符串,该字符串为字节流,如网络传输时,不能传输int,此时先将int转化为字节流,然后再发送;
2.按照指定格式将字节流转换为Python指定的数据类型;
3.处理二进制数据,如果用struct来处理文件的话,需要用’wb’,’rb’以二进制(字节流)写,读的方式来处理文件;
4.处理c语言中的结构体;
参考:
https://blog.csdn.net/qq_30638831/article/details/80421019
二.MNIST数据集
下载地址,
MNIST 数据集来自美国国家标准与技术研究所, National Institute of Standards and Technology (NIST),它包含了四个部分:
Training set images: train-images-idx3-ubyte.gz (9.9 MB, 解压后 47 MB, 包含 60,000 个样本)
Training set labels: train-labels-idx1-ubyte.gz (29 KB, 解压后 60 KB, 包含 60,000 个标签)
Test set images: t10k-images-idx3-ubyte.gz (1.6 MB, 解压后 7.8 MB, 包含 10,000 个样本)
Test set labels: t10k-labels-idx1-ubyte.gz (5KB, 解压后 10 KB, 包含 10,000 个标签)
1.解压缩
将解压缩后的文件放到同一个文件夹MNIST_data下面。
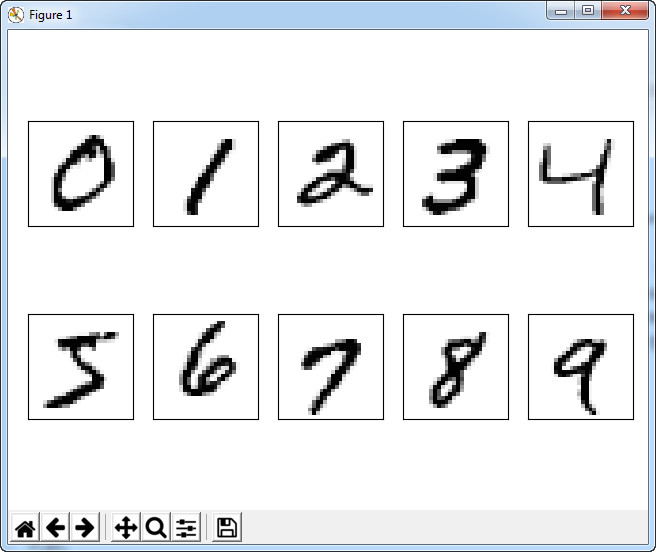
2.读取所有数字
下载的文件解压后是字节文件,使用下面的方法读取。
代码:
import os
import struct
import numpy as np
import matplotlib.pyplot as plt


def load_mnist(path, kind="train"):
    labels_path = os.path.join(path, '%s-labels.idx1-ubyte' % kind)
    images_path = os.path.join(path, '%s-images.idx3-ubyte' % kind)

    with open(labels_path, 'rb') as lbpath:
        magic, n = struct.unpack('>II', lbpath.read(8))
        # 'I'表示一个无符号整数,大小为四个字节
        # '>II'表示读取两个无符号整数,即8个字节
        labels = np.fromfile(lbpath, dtype=np.uint8)

    with open(images_path, 'rb') as imgpath:
        magic, num, rows, cols =  struct.unpack('>IIII', imgpath.read(16))
        images = np.fromfile(imgpath, dtype=np.uint8).reshape(len(labels), 784)

    return images, labels


X_train, y_train = load_mnist("MNIST_data", kind="train")
X_test, y_test = load_mnist("MNIST_data", kind="t10k")

fig, ax = plt.subplots(nrows=2, ncols=5, sharex=True, sharey=True)

ax = ax.flatten()
for i in range(10):
    img = X_train[y_train == i][0].reshape(28, 28)
    ax[i].imshow(img, cmap='Greys', interpolation='nearest')

ax[0].set_xticks([])
ax[0].set_yticks([])
plt.tight_layout()
plt.show()
备注:
load_mnist 函数返回两个数组, 第一个是一个 n x m 维的 NumPy array(images), 这里的 n 是样本数(行数), m 是特征数(列数). 训练数据集包含 60,000 个样本, 测试数据集包含 10,000 样本. 在 MNIST 数据集中的每张图片由 28 x 28 个像素点构成, 每个像素点用一个灰度值表示. 在这里, 我们将 28 x 28 的像素展开为一个一维的行向量, 这些行向量就是图片数组里的行(每行 784 个值, 或者说每行就是代表了一张图片). load_mnist 函数返回的第二个数组(labels) 包含了相应的目标变量, 也就是手写数字的类标签(整数 0-9).
3.读取某个数字多张图片
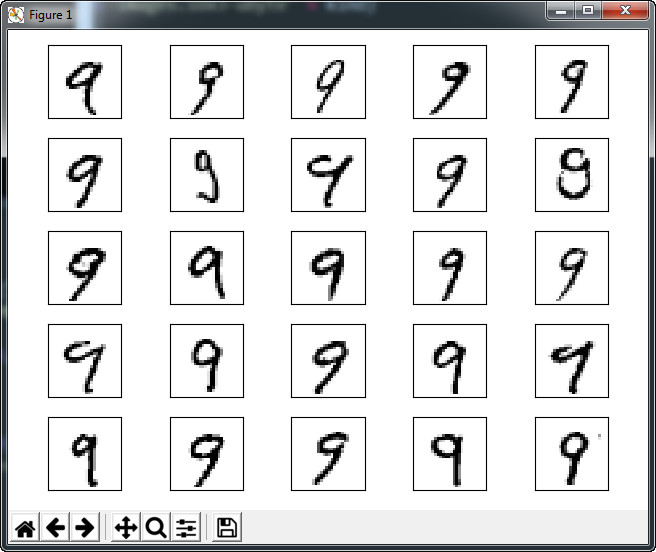
代码
import os
import struct
import numpy as np
import matplotlib.pyplot as plt


def load_mnist(path, kind="train"):
    labels_path = os.path.join(path, '%s-labels.idx1-ubyte' % kind)
    images_path = os.path.join(path, '%s-images.idx3-ubyte' % kind)

    with open(labels_path, 'rb') as lbpath:
        magic, n = struct.unpack('>II', lbpath.read(8))
        labels = np.fromfile(lbpath, dtype=np.uint8)

    with open(images_path, 'rb') as imgpath:
        magic, num, rows, cols =  struct.unpack('>IIII', imgpath.read(16))
        images = np.fromfile(imgpath, dtype=np.uint8).reshape(len(labels), 784)

    return images, labels


X_train, y_train = load_mnist("MNIST_data/", kind="train")
X_test, y_test = load_mnist("MNIST_data/", kind="t10k")

fig, ax = plt.subplots(nrows=5, ncols=5, sharex=True, sharey=True)

ax = ax.flatten()
for i in range(25):
    img = X_train[y_train == 9][i].reshape(28, 28)
    ax[i].imshow(img, cmap='Greys', interpolation='nearest')

ax[0].set_xticks([])
ax[0].set_yticks([])
plt.tight_layout()
plt.show()
4.写入CSV文件
import os
import struct
import numpy as np
import matplotlib.pyplot as plt


def load_mnist(path, kind="train"):
    labels_path = os.path.join(path, '%s-labels.idx1-ubyte' % kind)
    images_path = os.path.join(path, '%s-images.idx3-ubyte' % kind)

    with open(labels_path, 'rb') as lbpath:
        magic, n = struct.unpack('>II', lbpath.read(8))
        labels = np.fromfile(lbpath, dtype=np.uint8)


    with open(images_path, 'rb') as imgpath:
        magic, num, rows, cols =  struct.unpack('>IIII', imgpath.read(16))
        images = np.fromfile(imgpath, dtype=np.uint8).reshape(len(labels), 784)


    return images, labels


X_train, y_train = load_mnist("MNIST_data/", kind="train")
np.savetxt('train_labels.csv', y_train,fmt='%i', delimiter=',')
np.savetxt('train_img.csv', X_train,fmt='%i', delimiter=',')
print("写入完成!")
参考:
https://blog.csdn.net/simple_the_best/article/details/75267863
https://blog.csdn.net/qq_33254870/article/details/81388620
三、识别数字
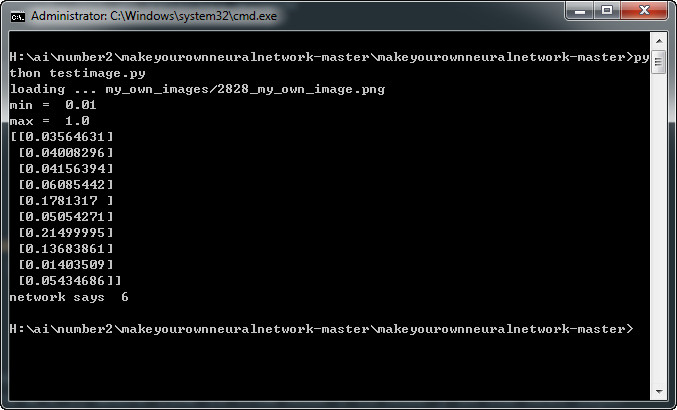
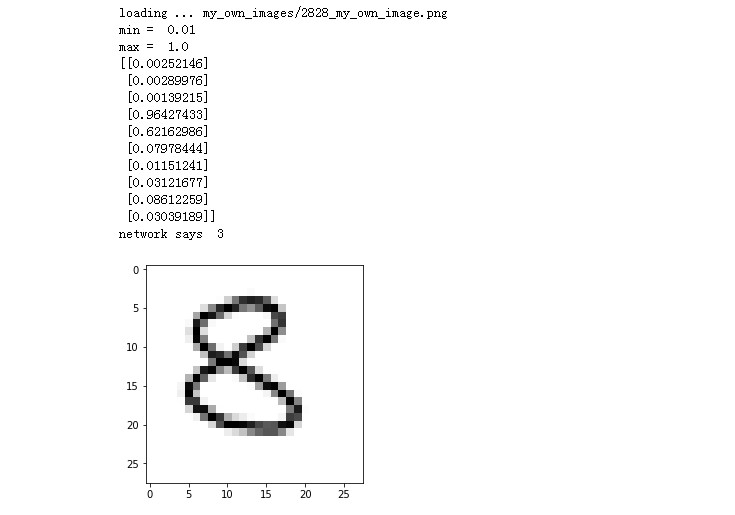
1.运行结果
2.代码
# python notebook for Make Your Own Neural Network
# code for a 3-layer neural network, and code for learning the MNIST dataset
# this version trains using the MNIST dataset, then tests on our own images
# (c) Tariq Rashid, 2016
# license is GPLv2

import numpy
# scipy.special for the sigmoid function expit()
import scipy.special
# library for plotting arrays
import matplotlib.pyplot
# ensure the plots are inside this notebook, not an external window
# %matplotlib inline

# helper to load data from PNG image files
import imageio

# neural network class definition
class neuralNetwork:


    # initialise the neural network
    def __init__(self, inputnodes, hiddennodes, outputnodes, learningrate):
        # set number of nodes in each input, hidden, output layer
        self.inodes = inputnodes
        self.hnodes = hiddennodes
        self.onodes = outputnodes

        # link weight matrices, wih and who
        # weights inside the arrays are w_i_j, where link is from node i to node j in the next layer
        # w11 w21
        # w12 w22 etc
        self.wih = numpy.random.normal(0.0, pow(self.inodes, -0.5), (self.hnodes, self.inodes))
        self.who = numpy.random.normal(0.0, pow(self.hnodes, -0.5), (self.onodes, self.hnodes))

        # learning rate
        self.lr = learningrate

        # activation function is the sigmoid function
        self.activation_function = lambda x: scipy.special.expit(x)

        pass


    # train the neural network
    def train(self, inputs_list, targets_list):
        # convert inputs list to 2d array
        inputs = numpy.array(inputs_list, ndmin=2).T
        targets = numpy.array(targets_list, ndmin=2).T

        # calculate signals into hidden layer
        hidden_inputs = numpy.dot(self.wih, inputs)
        # calculate the signals emerging from hidden layer
        hidden_outputs = self.activation_function(hidden_inputs)

        # calculate signals into final output layer
        final_inputs = numpy.dot(self.who, hidden_outputs)
        # calculate the signals emerging from final output layer
        final_outputs = self.activation_function(final_inputs)

        # output layer error is the (target - actual)
        output_errors = targets - final_outputs
        # hidden layer error is the output_errors, split by weights, recombined at hidden nodes
        hidden_errors = numpy.dot(self.who.T, output_errors)

        # update the weights for the links between the hidden and output layers
        self.who += self.lr * numpy.dot((output_errors * final_outputs * (1.0 - final_outputs)), numpy.transpose(hidden_outputs))

        # update the weights for the links between the input and hidden layers
        self.wih += self.lr * numpy.dot((hidden_errors * hidden_outputs * (1.0 - hidden_outputs)), numpy.transpose(inputs))

        pass


    # query the neural network
    def query(self, inputs_list):
        # convert inputs list to 2d array
        inputs = numpy.array(inputs_list, ndmin=2).T

        # calculate signals into hidden layer
        hidden_inputs = numpy.dot(self.wih, inputs)
        # calculate the signals emerging from hidden layer
        hidden_outputs = self.activation_function(hidden_inputs)

        # calculate signals into final output layer
        final_inputs = numpy.dot(self.who, hidden_outputs)
        # calculate the signals emerging from final output layer
        final_outputs = self.activation_function(final_inputs)

        return final_outputs

# number of input, hidden and output nodes
input_nodes = 784
hidden_nodes = 200
output_nodes = 10

# learning rate
learning_rate = 0.1

# create instance of neural network
n = neuralNetwork(input_nodes,hidden_nodes,output_nodes, learning_rate)

# load the mnist training data CSV file into a list
training_data_file = open("mnist_dataset/mnist_train_100.csv", 'r')
training_data_list = training_data_file.readlines()
training_data_file.close()


# train the neural network

# epochs is the number of times the training data set is used for training
epochs = 10

for e in range(epochs):
    # go through all records in the training data set
    for record in training_data_list:
        # split the record by the ',' commas
        all_values = record.split(',')
        # scale and shift the inputs
        inputs = (numpy.asfarray(all_values[1:]) / 255.0 * 0.99) + 0.01
        # create the target output values (all 0.01, except the desired label which is 0.99)
        targets = numpy.zeros(output_nodes) + 0.01
        # all_values[0] is the target label for this record
        targets[int(all_values[0])] = 0.99
        n.train(inputs, targets)
        pass
    pass

# test the neural network with our own images

# load image data from png files into an array
print ("loading ... my_own_images/2828_my_own_image.png")
img_array = imageio.imread('my_own_images/2828_my_own_6.png', as_gray=True)

# reshape from 28x28 to list of 784 values, invert values
img_data  = 255.0 - img_array.reshape(784)

# then scale data to range from 0.01 to 1.0
img_data = (img_data / 255.0 * 0.99) + 0.01
print("min = ", numpy.min(img_data))
print("max = ", numpy.max(img_data))

# plot image
matplotlib.pyplot.imshow(img_data.reshape(28,28), cmap='Greys', interpolation='None')

# query the network
outputs = n.query(img_data)
print (outputs)

# the index of the highest value corresponds to the label
label = numpy.argmax(outputs)
print("network says ", label)
可是准确性不够啊,输入2,识别为1.
3.完善
将自己制作的mnist_train替换原来的mnist_train_100.csv,结果程序报错,应该是少了一列。通过查看mnist_train_100.csv,发现要将train_labels.csv中的值(1-9)放进去作为train_img.csv的第一列。就可以运行了,可是数据量太大,运行很久都没有运行完。
4.解决
最后将代码上传到极客云上面运行,选择的是“RTX 2080 Ti 双卡 Ryzen 9 3900X 24核32G 2TB SSD 网速D1000/U50 (独占6.7元每小时) A”的机器 ,几分钟就出结果了。
最后的测试结果是:
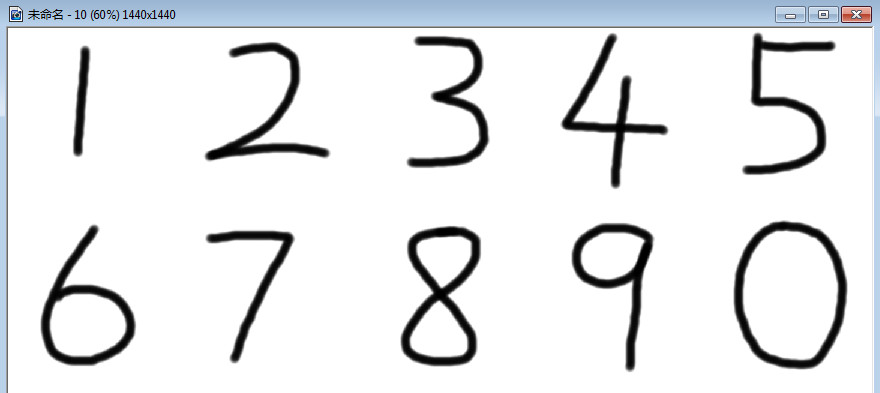
下载别人的2,3,4,5,6都识别了出来。
我自己写的8没有识别出来。
总体情况如下:
识别到的数字: 0 2 3 5
未识别到的数字: 1(2) 4(8) 6(8) 7(3) 8(3) 9(1
可参考:
https://github.com/makeyourownneuralnetwork/makeyourownneuralnetwork
https://blog.csdn.net/ebzxw/article/details/81591437